Instructions for 7 ways to tie a men's tie both fast and beautiful, easy to do
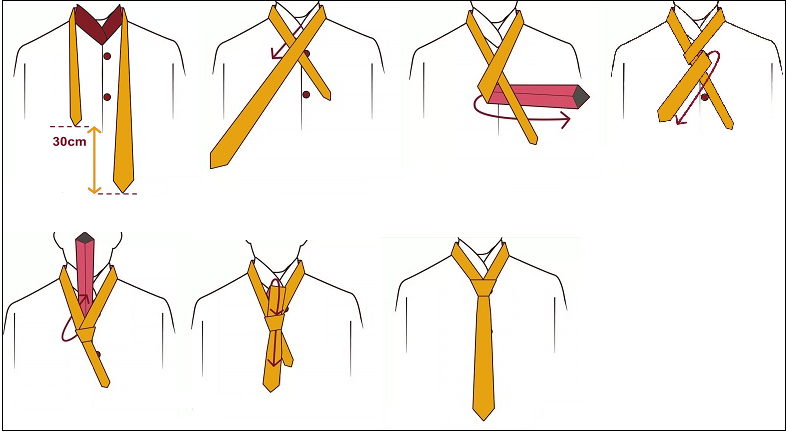
1 Four in Hand Knot
The Four in Hand Knot style is extremely suitable for narrow collars , can be confident in many different contexts and occasions, parties and events, but mostly used in parties with a youthful, modern direction. modern, comfortable … due to small knots, slightly asymmetrical shape, it will be quite picky with occasions that need solemnity. Here's how to tie a Four in Hand Knot in just 7 easy steps.
Doing:
Step 1 : First, open up your collar, hold the tie in your hand and put the wide side of the tie on the right side, and the narrower (smaller) side on the left side and place it about 30 cm higher. .
Step 2 : You hold the wide side of the tie over the left side of the narrow side, holding the two versions of the tie together with your left hand, near your neck.
Step 4 : Continue to loop upwards again right where your left hand is holding the two copies (the front of the tie is still facing the front and the seams are hidden at the back).
Step 5 : The right hand still holds the end of the wide plate and pulls up the back of the two plates at the neck.
Step 6 : Bring the wide end down through the gap in the knot.
Step 7 : Hold the top end of the narrow plate and push the knot up to close to the neck. Adjust the knot to make it even and tight, close the collar down, and adjust the length of the tie accordingly. It's best if the wide end that is close to your waist is a good fit.
2 Pratt
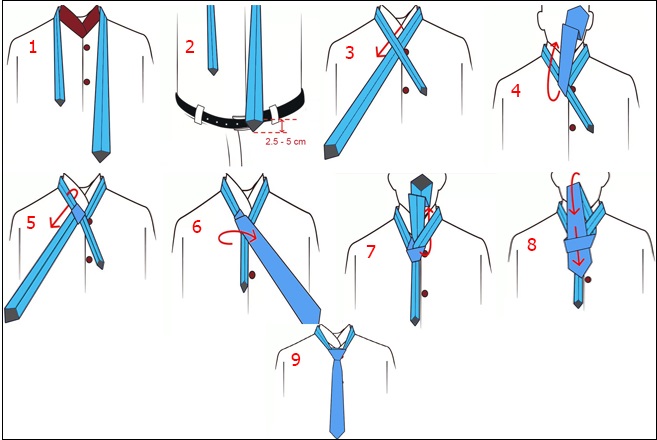
Pratt Knot is a style that is reasonable to go anywhere, suitable for all situations. You are completely free to combine with your favorite shirt. With a triangular shape, this knot is a little looser than the Windsor knot, which is easy to remove. Therefore, this way of tying is extremely suitable for "men" who want to go out and gather with friends after work.
This Pratt knot is suitable for medium-thick ties, and the large version is more suitable for tying than the small one. When finished, the knot in the middle will have a moderate width, but larger than the Four-in-hand knot and will be smaller than the Half windsor knot.

How to do it :
Step 1 : Place the tie on the wrong side and thread it around your collar. How to tie this Pratt starts with leaving the tie on the left side, leaving the wide side of the tie on the right side, and the narrow side on the left side.
Step 2 : Check the position of the wide end. Let the top of the wide version just touch the lower eyelid of your belt buckle. However, you can still increase or decrease it in the range of 2.5 to 5 cm.
Step 3 : Cross the wide version over the narrow version. You move the end of the wide plate diagonally to the left and under the narrow plate.
Step 4 : Move the wide version to the top, cut across the narrow side where the knot is near the collar.
Step 6 : Fold the wide version from the left side to the right side. This hides the seam side of the wide version to the back.
Step 7 : Pull the wide version up and behind the intersection of the two right at your collar.
Step 8 : Bring the end of the wide plate down in front of the face through the gap of the knot.
Step 9 : Slide the knot up to adjust it to the center of the collar. Pull the wide piece down to tighten the knot.
3 Half Windsor
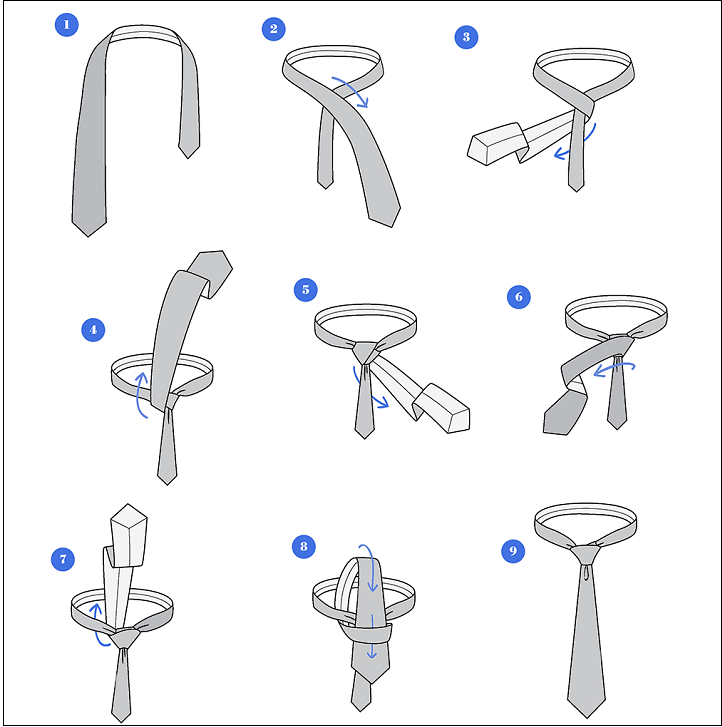
The way to tie a tie in the style of Half Windsor is suitable for wearing on important occasions. As this is a variation on the traditional Windsor knot, a tie is usually appropriate for wide-collared shirts.
But an improvement over the traditional Windsor knot is that this is suitable for all types of collars because the knots are simpler and more compact. It is suitable for all types of ties with small, medium and large versions and also different types of fabrics.

How to do it :
Step 1 : First, hold the tie in your hand, open your collar and wrap it around your neck. The wide part of the tie will be on the right side and about 30 cm lower than the narrow (small) left side.
Step 2 : You hold the end of the wide tie over the left side and lie in front of the narrow version.
Step 3 : Fold the wide side of the tie to the back of the narrow one and pull it to the right as the top position. At this time, the seam side of the wide plate will be visible at the front.
Step 4 : Grab the wide side of the tie and pull it up to the top of your neck and hold it firmly at the intersection of the knot.
Step 5 : Thread the wide plate inward and pull it down to the left side.
Step 6 : Take the wide plate and fold over the front of the knot again.
Step 7 : Pull the wide piece to the back of the knot a second time.
Step 8 : Loosen the knot a little and thread the wide piece from top to bottom through the knot.
Step 9 : One hand holds the small plate, one hand gently holds the knot and pushes it to the top of the collar. Adjust the knot to tighten and squeeze gently to form a dimple in front of the knot.
4 Full Windsor
This is the ideal knot for formal occasions. The knot is thick, wide, triangular, and perfectly proportioned. This way of knotting is extremely suitable for wide neck blouses and often appears in weddings, speeches and important meetings.
This knot is tricky as it has to completely cover the top button of your shirt and has to be exactly between the ends of your collar.

How to do it :
Step 1 : Place the tie on the collar on the right side with the large piece on the left, the small piece on the right.
Step 2 : Place the large piece on top of the small piece.
Step 3 : Pull the large piece back, thread it up through the slit around the neck.
Step 4 : Drag the large piece over the small piece in the first direction in step 2.
Step 5 : Fold the large piece behind the small piece.
Step 6 : Drag the large piece upwards as shown.
Step 7 : Then thread it down the slit around the neck.
Step 8 : Fold the large piece over the small piece.
Step 9 : Pull the large piece upwards through the slot again like step 3.
Step 10 : Thread it through the knot.
Step 11 : Re-align the knot.
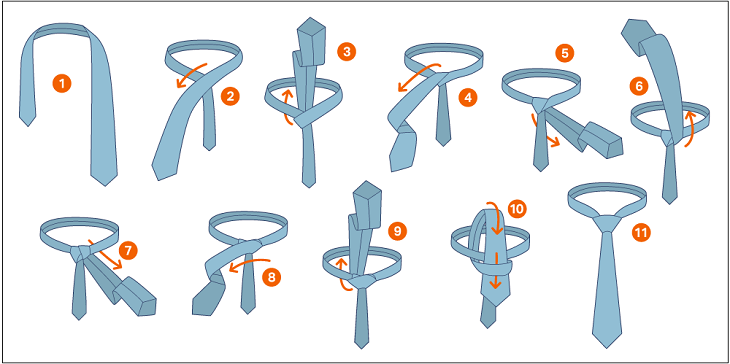
5 Balthus
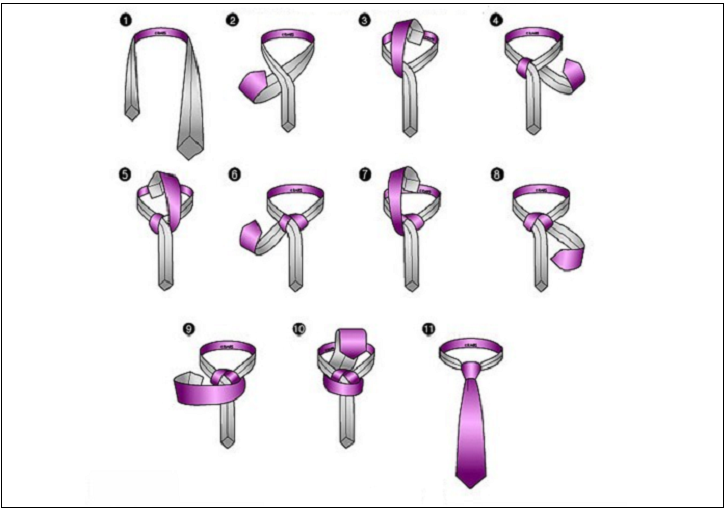
This is one of the hardest knots with 11 moves. The Balthus tie was the tie knot worn by European aristocrats in the past. This tie style brings elegance, elegance and freedom. You can tie it in a Balthus style to suit important events with a large number of people.

How to do it :
Step 1 : Place the tie on the collar on the left side with the large piece on the left, the small piece on the right.
Step 2 : Fold the large piece behind the small piece.
Step 3 : Drag the large piece upwards and put it in the button.
Step 4 : Round the large piece to the front left.
Step 5 : Drag the large piece up and put it on the button as shown in picture 5.
Step 6 : Drag the large piece to the front right.
Step 7 : Drag the large piece up and put it on the button as shown in Figure 7.
Step 8 : Round the large piece to the front left.
Step 9 : Drag the large piece to the right and fold over the small piece.
Step 10 : Put the large piece a few buttons as shown in Figure 10.
Step 11 : Tie the knot and adjust the tie.
6 Cafés
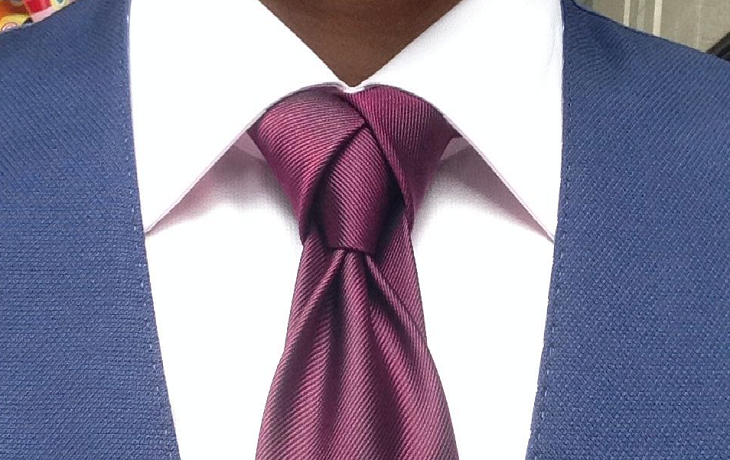
As the name implies, this style of tie was the style that was favored by frequented Café customers in the early 20th century. This knot is quite sophisticated and complicated, intended to attract attention. idea.
This style of knot is better suited to a casual suit or a sports jacket or even a short-sleeved T-shirt. It is not suitable for the office or similar formal events.
How to do it :
Step 1 : Put the tie on the collar on the right side, the large piece on the right, the small piece on the left.
Step 2 : Fold the small piece on top of the large piece and loop back to the button.
Step 3: Pull the small piece forward and fold it behind the large piece.
Step 4 : Loop the small piece to the top and pull it up for the button.
Step 5 : Drag the small piece out and to the left.
Step 6 : Loop the small piece behind the big piece.
Step 7 : Pull up the small piece and put it in the button.
Step 8 : Put the small piece into the small button on the back of the tie.
Step 9 : Pull the small piece down.
Step 10 : Curl the large piece.
Step 11: Tie the knot and align the tie. 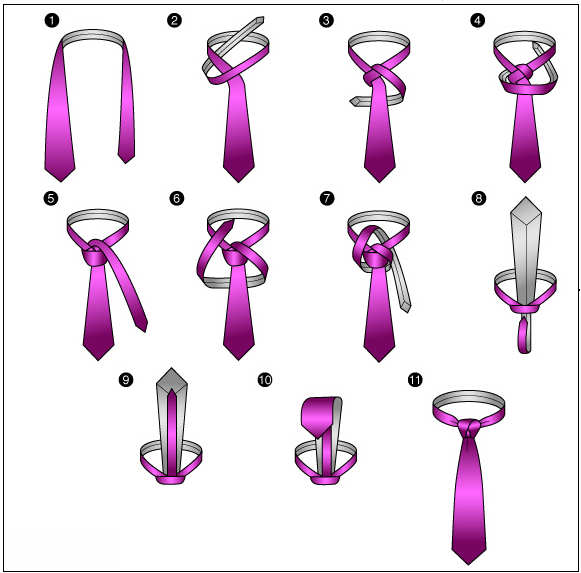
7 Trinity
Like the Eldredge style, the Trinity tie also has a unique shape when it creates 3 symmetrical angles instead of 1 straight angle like conventional knots.
When you're done tying, you'll see a fairly large knot. You should also only use this knot in everyday events instead of formal places.

How to do it :
Step 1 : Put the tie on the collar on the right side, the large piece on the right, the small piece on the left.
Step 2 : Fold the small piece over the large piece and thread it through the button from the bottom.
Step 3 : Pull the small piece outward to the right.
Step 4 : Fold the small piece behind the thin piece.
Step 5 : Drag the small piece upwards.
Step 6 : Drag the small piece over the button and bring it to the right.
Step 7 : Fold the small piece on top of the large piece and pull over the button from the bottom.
Step 8 : Pull the small piece out and put it in the button.
Step 9 : Put the small piece behind the big piece.
Step 10 : Drag the small piece over the button as shown in Figure 10.
Step 11 : Pull the small piece to create a knot.
Step 12 : Tie the knot and align the tie.

(*Reference source: cavat.com )
Above are the top 7 popular ways to tie a tie for men. Hope you guys will choose a style that suits you best. If you have any questions, please comment below, Dien May XANH will answer for you!
The post https://meo.tips/beauty/instructions-for-7-ways-to-tie-a-mens-tie-both-fast-and-beautiful-easy-to-do/ appeared first on Meo.tips.
View more from Meo.tips:
After sauna, should I wear a mask? How many times a week should I steam my face?What flour should be used to make moon cakes to make them delicious and attractive?
The "super" trick to shorten the cooking time in half
How to cook and preserve rice so it won't go stale when left in the hot season
Cook fast, healthy and delicious with the microwave
The simple secret to deodorizing all kinds of meat
The secret to saving energy when cooking
The secret to choosing quality avocados
How to choose clean cooking oil and use safe oil
Unexpected uses of salt that few people know
How to limit leftovers?
Life experience you need to know before turning middle age
Tips to arrange a luxurious dining table at home
How to prevent mold in your home?
What is noise level? What is the maximum intensity that humans can hear in dB?
Find out the meaning of white, red and black Valentine's Day
7 reasons why facial skin is oily and how to take care of it properly
Should you store lotions, masks, toners, cosmetics in the refrigerator?
How to read a mercury thermometer and measuring location for the most accurate results
Revealing 8 good tips to "fire" for oily hair in the summer
Nhận xét
Đăng nhận xét